
FEATURE WALKTHROUGH
This section is to give the user a thorough introduction to features and important behaviors in Janus. It is categorised as Features and Capabilities, and Behaviour. I advise to also look into the tutorials (available at the Janus website) which demonstrate how some of these features are actually used. If you've already viewed some of the demos then here is a more verbose explanation of those features.
Offline Method (Offline Breakout)
Janus’s offline breakout feature enables you to breakout render passes without requiring you to load the scene. The offline breakout feature is not complete replacement to the standard ‘online’ method because Janus still needs to apply grouping data. The offline breakout feature is best used either when you want to correct some settings in the passes you’ve already exported, or create new passes based on your existing group setups.
Set up your passes first
Before you can use the offline method, you still need to initially set up your passes when the scene is loaded. Once you’ve set up your scene, Janus needs to write some grouping information into the master scene. To do this, you can break out a pass, or go the Items In Group menu > TAG GROUPING data to items in scene.
Load an offline file
To use the the offline method, load a scene into Janus via File menu > Load online file... Alternately, a recent scenes list is appended at the bottom of this popup menu.
When the file is loaded you will see scene’s name appear at the title bar of the Janus interface with the indicator ‘(OFFLINE)’ beside it. Note that if the offline file you are is outside your current content directory, Janus will prompt you to change to that content directory. You must be in the same content directory as the offline file.
Set the definition file
Janus will attempt to locate the definition file associated with the offline file. If, for some reason, it is unable to locate it, load it in manually using File menu > Load definition file...
Offline modes
You will notice that when the offline file was loaded, a popup menu appears on the upper-right hand side of the interface, at the left of the Janus logo image. This is your offline mode indicator. You can switch between two modes called ‘New breakout’ and ‘Modify breakout’.
New breakout mode
The ‘New breakout’ mode creates new breakout passes. You use this mode if you want to change object settings (e.g. meshes, lights, and cameras), as well as scene parameters. You can use this mode to create totally new breakout passes. It operates very similarly to the ‘online’ method, so you can use this in the same way you normally do. However, there are a few limitations:Surface overrides (SRF): surface overrides using the SRF subcommand is limited in the offline mode. In the offline mode, Janus does not generate new surface override objects. Instead it uses override objects that you should generate using Janus in ‘online’ mode. You do not need to change the SRF subcommand in the offline mode; Janus will evaluate the SRF subcommand and determine what surface override object is being used and replaces it accordingly. Dynamic mesh combine (COMBINE): this subcommand is not supported; Janus uses LW mesh-handling functions - available only when the scene is loaded - to apply this functionality.
Modify breakout mode
The ‘Modify breakout’ mode only modifies the scene-centric parameters of existing breakout scenes. If you only want to change scene parameters (i.e. camera resolution, radiosity settings, image filters, etc), this mode is appropriate and more efficient than ‘New breakout’. To use this mode, switch the offline mode to ‘Modify breakout’.Although Janus modifies the existing breakout scenes, you don’t actually load the breakout scenes into Janus. You apply new settings through the master scene’s render passes, which is associated with a specific breakout file. To modify a breakout, simply select a render pass, change your desired settings and execute a breakout.
A note of warning: the location of breakout scenes is determined by particular subcommand, global settings, and preferences. For example, changing the location of your breakout scenes or breakout folder name in the Preferences; changing the SCENENAME, OUTFILE, SUBSCENENAME, or PASSNAME subcommands will affect the final location of the breakout, and Janus may not be able to find the correct render pass. Make sure that you are only changing parameters that don’t affect the final location of the breakout scenes.
Unloading offline files
To unload the offline file by going to File menu > Unload offline file. This brings you back to the default ‘online’ mode.
In offline mode, Janus writes and modifies new information into your scene file and/or your existing breakout scenes. Because of this, an incremental save function has been included with the system as a safeguard. You can access offline-related options, such as backup folder name, maximum number of increments, and increment naming format in Preferences > Offline.
User Functions
User functions is the ability of Janus to use external script functions to process a render pass cmd line before it it sent off for breakout or test-render. See this section for more details.
Proxy Replacement System (SmartReplace)
The proxy replacement system in Janus follows a simple technique called SmartReplace, which is also associated with a group of scripts included with Janus. (Those scripts are independent of Janus and are not required to use this proxy system.)
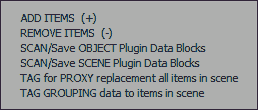
The proxy system tags objects with their name so that they can be unloaded in LightWave, and then re-loaded during pass breakout. This facilitates a faster workflow for very heavy scenes, by SmartReplace'ing the objects with nulls, enabling you to load the scene quickly. You can even make test renders (via Janus) on a SmartReplace'd scene (e.g. a scene full of nulls). In Janus, SmartReplace takes the form of tagging all items in the scene. It accessed in the Items in Group menu > TAG for PROXY replacement all items in scene. Once the scene is tagged for SmartReplace, save the scene.
To use the proxy system, see the PROXYOBJECT subcommand type.
Plugin Data and Data Blocks
Janus enables users to save plugin (handler) data, and data blocks that are stored in the scene file and re-apply them on a per-pass settings. The following types are supported.
Janus categorises plugin data and data blocks into object-centric and scene-centric. Object-centric refers to plugins or data blocks that are attached to objects (e.g. items in Layout), while scene-centric plugins or data data blocks are those attached to the scene.
If you wish to save object-centric data, select those items and run Save OBJECT Plugin / Data Blocks (in the Items in Group popup). Note that Lights contains some useful data blocks like VolumetricLights, which you can store.
Scene-centric data, on the other hand, can be saved by choosing Save SCENE Plugin / Data Blocks. Layout selection is not needed as it will simply retrieve all known scene plugins / data blocks.
In both object-centric and scene-centric categories, you select the data you wish to save and then click on the View Plugin Parameters button.
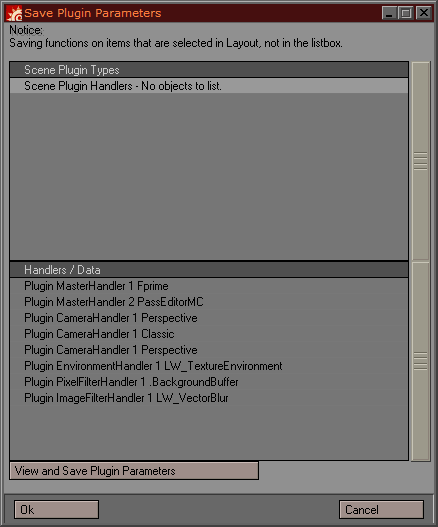
There you will see a preview of the data block that's going to be saved. If you notice that this indeed is the data block corresponding to your intended settings, type a preset name for this and click OK. You cannot change the data block's settings from this window.

Important note: saved plugin / data blocks are saved in files categorised as object- or scene-centric. You may peruse and/or modify them in Janus_PLUGINDEF.cfgand Janus_SCENEPLUGINDEF.cfg, respectively.
Notes on CameraHandlers and LightHandlers. There are some CameraHandlers and LightHandlers (available in LightWave 9.5) that require customised settings to operate properly. Therefore, if you're planning to use handlers such as Advanced Camera, it is recommended that you set your settings and save them as a plugin data block - let's call it a user-defined camera block. Then you use this block as your camera settings. For example, given that you have already saved a CameraHandler (using the method described above) called "myAdvancedCam":
BTY2.FG.CamType"myAdvancedCam".car
But if you use Advanced, which is registered as a LightWave camera, it will simply use the default settings that LightWave uses.
This applies to LightHandlers as well. Though it looks as if there are new lights in LightWave 9.5, they actually take the form of LightHandlers. Therefore, once again, if you plan to use a light such as Dome, set your light settings and then save them. If not Janus will leave it to LightWave to set its own default settings. Other 3rd-party lights, like those of Denis Pontonnier's collection may have behave differently if no settings are specified. To be safe, save a user-defined light block.
Dynamically changing plugin parameters on a per-pass basis
Plugin parameters can be dynamically changed on a per-pass basis. You would want to do this if you need to tie in something that is specific to the pass. A common application of this is when you want to change the output paths of custom image savers to reflect the given render pass's output.
The most basic way to change plugin parameters is to input constant variables, or user variables into the field of the plugin. For instance, if a string field requiring you to input a filename, you may type in instead %JN_PASSOUTPUT%, and when Janus recalls this plugin setting it will replace %JN_PASSOUTPUT% with the appropriate value.
However, there are times when this doesn't work: notably, numerical inputs. Since Janus's variables are strings, you need to work around this limitation by allotting a unqiue numerical value to that particular setting. After allotting a number, you can then instruct Janus to replace certain numbers into strings, namely Janus variables, so that the Janus engine can process it correctly. You can instruct Janus to replace these unique numbers by using the Janus_PluginDataModifiers.txt file. This text file's format is described in the Appendix A and the use of this file is also outlined there.
The Script System (Pre-/Post-Breakout LScripts)
In the latter builds of v1.6, pre-/post-breakout scripts were introduced. In v1.7, the same system has been extended so that external scripts can play a more significant role in the Janus.
A pre-/post-breakout script can be executed before or after a breakout process has been executed, You can specify these scripts in the Preferences > General tab under their corresponding fields. You can also use the PREBREAKOUTLS and POSTBREAKOUTLS subcommands to specify scripts on a per-pass basis.
You may execute these LScripts automatically, which runs whenever you breakout a render pass, or you can do it manually by clicking on Render Pass menu > Run PRE-BREAKOUT LScript.... or Run POST-BREAKOUT LScript. You can switch between automatic and manual mode by going to the Miscellaneous Options menu and ticking, or unticking the corresponding options.
There is a new Scripts menu featured on the interface; this menu sports three pre-built scripts (Janus_SendTo_Photoshop, Janus_SendTo_AfterEffects, and Janus_LWSN_3_Render) and you have the option of loading new scripts in (note: adding the script as a plugin in LightWave is a prerequisite to using the script in the first place).
Note that there is no real functional difference between a post-breakout script and a script in the Script menu; both are executed as a 'post-breakout' script. The only difference is that you can register several script in one menu, whereas only one post-breakout scripts can be specified in the preferences, or as a subcommand.
Bearing in mind that this feature was created mainly to assist in integrating Janus with various render pipelines, Janus pipes out its own particular data so that scripts can access them. For instance, in order to relay a render pass's LAYERNAME parameter, the Janus_SendTo_Photoshop accessed the Janus variable called JN_CmdInheritVar. These variables are useful in making other tools; here is a list of all variables currently outputted by Janus.
Note that these variables are cleared after every processing of a pass so they only exist within the context of the pass being processed. Pre-breakout LScript, furthermore, do not have access to these values. These variables can be accessed by using the globalrecall() function in LScript. For example:
MySceneName = globalrecall("JN_SceneName","");
contentDir = globalrecall("JN_ContentDir","");
Global Settings vs Commands
Global settings are those settings that are inputted directly in the main UI. These settings serve as a the default render settings for the current project. However, commands always have priority dictating render settings. For example, if you put Resolution Multiplier to 100%, and then specify a command such as,
BTY.BG.MULTIPLIER2.myGroup
..then MULTIPLIER2 (Resolution Multiplier 50%) will be used for that pass. So, as a rule, use global settings for parameters that are serve as the base.
Also remember that if you do not specify a certain parameter in either a command or the global settings, the parameters would be drawn from your current scene's settings.
Copy/Paste/Remove/Add Subcommands
You can copy and paste subcommands from one render pass to another (you can also copy global settings). You do this by going into Render Pass Subcommand category, selecting a render pass, and then select a subcommand in the list; then hit the C button at the top edge of the list; select another render pass and press the P button to paste. You can copy and paste multiple subcommands. To flush the clipboard of its contents, go the Hotkey Editor and assign the Flush Clipboard command to a key.
![]()
To remove a subcommand, click on the '--' button; this brings up a popup menu with a single item called "REMOVE subcommand". Press and release to remove the subcommand.
To add a subcommand that's been selecetd in the list, click on the "+" button; make sure you have a render pass selected.
Hotkeys
You can map hotkeys to most functions available in Janus through menus and buttons. Please see the interface walkthrough for more details.
Composite Command Type
A composite command type, is a kind of command type that calls two or more other command types to be run on the same command- hence 'composite'. This feature allows you to dynamically switch between different command types on the same command instead of having to duplicate it.
A composite command type is a symbolic command type which contains only runtime directives, and these directives point to the command types that are to be run. For example, a user can use a command type called "BasicPasses" and looks like this:
[BasicPasses]
runtime=DIFF,SPEC,BTY2
When you assign BasicPasses to a render pass Janus will read the 'runtime' directive and produce three render passes (DIFF, SPEC, and BTY2, based on the example above) .
Note that the runtime directive accepts any number of command type names, separated only by a comma (,).
To create a composite command type, look at the CREATE / EDIT Runtime (Composite) Preset function.
You can also approach the concept in a more programmatic manner through the use of For Loops.
Propagation Groups
Propagation is a switch in a group that instructs that group to apply its settings not only to the direct items it holds, but also to the children of those items as they are parented in Layout. Propagation, by default, is switched on every time you create a new group. You know a group has propagation if it has an asterisk (*) at the end of the group type and if the P symbol beside its list is active. Example:

It is a workflow feature that has much benefit and you will be better to use them all the time, except for special situations. In Layout, use Null objects as "groups", then assign that single Null object to a Janus group that has propagation switched on. All settings you apply to that group will trickle down to its children.
With this workflow, simply parenting a new item under that Null object you effectively put that item into the group without going to the Janus interface to add it.
It is also possible to programmatically change settings of each item in the group separately through the use of user functions. See the Items in Group Overrides section.
Filters
Groups and render passes can be filtered for enhanced management. Groups have their own separate filters from render passes.
For Groups, you can filter them by name, by association to the currently selected render pass, by the current Active group, or by being one of the Other groups.
For Render passes, you can filter them out through render pass name, render pass's notes, its list of associated groups, or all of the aforementioned.
Furthermore, Filters can be saved by inputting the filter name into the string field and then clicking on the small dropdown control (the 'filter quick-recall') and selecting "-----[Save User Preset]-----". Everytime you input a new filter string Janus will automatically save it in its recent filters list. You will be able to access this recent filters by clicking on the filter quick-recall popdown; recent filters are those listed above the "-----[Save User Preset]-----" section.
Clicking on the red carat beside the filter string field will clear the field of its current contents.
Event Log
Janus sports an event log that informs you of errors, warnings, and other useful information about your groups and render passes.

The importance of this event log cannot be overstated. The log spots user errors or inconsistencies and will be your guide in troubleshooting problematic passes.
Here is a list of possible messages / warnings that is registered in the event log:
The event log can be disabled in the Miscellaneous Options menu.
~Mac note
The there is no direct equivalent of the Event Log in the Mac. However, all logs are still stored in a text file. To view the log, which is refreshed after every sessions of Janus, go to Configure menu > Open Event Log.
Search-And-Replace
Search-and-replace features are found in Janus for editing group names and commands. They can be a very flexible tool if you utilise a smart naming convention throughout your projects. For instance, there is search-and-replace renaming function in commands. Like the example set above, we can use the "USE SELECTION Create Group" function to create a group for each selection made in Layout. Let's say you have commands that read like this:
BTY.BG.ship1
BTY.BG.ship2
BTY.BG.ship3
BTY.BG.ship4
BTY.BG.ship5
By using the search-and-replace feature, we can select all the commands and execute RENAME Command. Then we input the following:
Search: .BG.
Replace: .BG.REPLACEACTIVE"\bty\""\occ\".
This will result in:
BTY.BG.REPLACEACTIVE"\bty\""\occ\".ship1
BTY.BG.REPLACEACTIVE"\bty\""\occ\".ship2
BTY.BG.REPLACEACTIVE"\bty\""\occ\".ship3
BTY.BG.REPLACEACTIVE"\bty\""\occ\".ship4
BTY.BG.REPLACEACTIVE"\bty\""\occ\".ship5
Render Pass Subcommand Category
Selecting -----Render Pass Subcommand----- in the category popdown will put Janus in a mode that lists all the subcommands of a particular pass. This allows you to view the inputted subcommands more easily. In this mode, you can edit your render pass subcommands by selecting an entry from the list, and modifying the values in the input field just above. Janus updates the value immediately.
You may also remove selected subcommands by selecting it and pressing the "-" button; it is a popdown menu with a single item "REMOVE Subcommand". Click and release to remove the selected subcommands.
Command Editing via CMD Field and Multi-line Editor.
Command editing can come in two forms: directly inputting new commands in the CMD string field, or using the multi-line command editor. Both achieve the same purpose, but the multi-line editor might be easier to read, depending on your preference.
For example, a command such as:
BTY.BG.VOLOFF.bigship
Will be listed in the multi-line editor as:
BTY
BG
VOLOFF
bigship
The editor also gives you the option to change command types, layer types, and subcommands only, ignoring other changes if there happens to be any. The editor can distinguish group types from layer types and subcommands. You can jumble up the segments and it will piece it back together. Two exceptions, however: if you have a command type with the name 'BG' or 'FG' or some other reserved name pointing to a subcommand, obviously Janus will not be able to distinguish between command type and layer type. So do not create a user-defined command type called 'BG' or 'FG'. The second exception is that the target group must always be the last entry. There are three checkboxes in the multi-line editor called:
These checkboxes filter out, or recognises changes you have made. If you wish to change a number of render passes from BG to FG, click on the Recognise Layer Type Change checkbox and replace 'BG' with 'FG'.
The CMD string field is smart, too. You can do almost everything that the multi-line editor can. The only difference is that it recognises all types of changes by default and applies to it the selected commands. If you wanted to change from BG to FG, all you have to do is select the commands, and then replace 'BG' with 'FG' in the string field and the changes will be applied.
Literal Subcommand Display and Editing using Global Settings Panel
Combining the ease of editing of the Multi-line Editor and the inbuilt display of the Render Pass Sucbommand Category display, Janus is able to switch to a 'literal subcommand display' mode where subcommands are displayed in their literal string format in a list form.
This allows you to select a particular item in the field (including Command Types, Layer Types, and Target Groups) and edit them quickly. You can use the '--' button to remove subcommands (though you can't do this for Command Types, Layer Types, and Target Groups). You can insert a blank subcommand line by using the '+' button.

Test Rendering
A pass can be test rendered immediately to find out if the objects appear as desired. This kind of rendering uses LWSN to render (not the usual F9 render).Because of this, multiple passes can be rendered all at the same time. However, note that a copy of the scene is loaded into memory per each pass, and they will be loaded, more or less at the same time. So keep an eye on your memory.
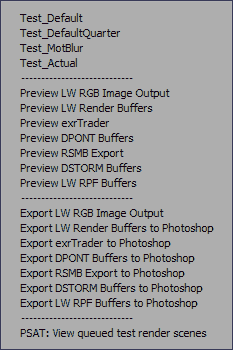
When the focus is on the Janus GUI, pressing F9 will execute the default test render preset. However, you can select from a list of test render presets in the Test Render menu.
Test renders are actually treated as command types/presets. Therefore, a test render activates a test render command type, applying relevant parameters to it (i.e. half-resolution). Janus provides one default preset, but they can be constructed via an interface.
Creating a Test Render Command Type
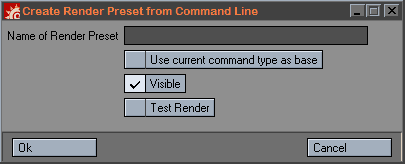
You can create a test render preset in two ways. The hard-core way is manually typing in the subcommands as a new command type in Janus_CommandTypes.txt just like you would any other command type. Include the directive 'test=true' in the command type, as this will tell Janus that is a test-render preset and will utilise it accordingly.
The easier way is through the GUI. The first step is to create a command, and then using the +/- buttons in the Global Settings panel, input subcommands into the command; of course the parameters should relate to the settings you want to use for the test render (i.e. no motion blur, lowered anti-aliasing settings). Then under Configure > CREATE Render Preset from Command Line, you will be prompted for a name for the preset. Make sure that the Test Render checkbox is checked before you hit OK.
Test rendering uses LWSN.exe (Screamernet) in mode 3 (command-line), and provides an excellent preview of how your frame may look like when it is rendered over a render farm. Sometimes, a regular F9 render does not yield the same results as when it is rendered over Screamernet; artefacts, errors with rendering with volumetrics, particles not being cached, multithreading inconsistencies, and the list goes on, appear in a Screamernet render, and gives you the opportunity to troubleshoot these problems before committing them to the render farm.
Previewing Test Renders and Buffers
Janus can bring up an previous test render of a pass and also the associated buffers of that pass. This requires that the Debug mode of Janus be left on because the method requires the lwsTest file to extract the locations of the images. To preview a test render you can go over to the Test Render menu (shown above) and select any of the Preview... entries.
Logging to file
Janus can optionally log the render progress to file for you to look at later. It will timestamp the start and end time of the render. This option can be turned on in Preferences > Write to output render log.
Exporting (Sending) Renders to Photoshop
As of v1.7, there are two ways to export renders to Photoshop. The first way is this: first configure Photoshop to be able to receive Janus-rendered test images. You can quickly send finished test renders (including buffers) to Photoshop through the Export functions in the Test Render menu
When you export images into Photoshop, a document is opened, and this document is 'tagged' to correspond with the scene that is currently being worked on in LightWave. If you test render a pass in order to revise it (e.g. overwrite the old render), and then export it again, the Photoshop script updates the Smart Object with the new file.
*** NOTE: the method mentioned above sends test renders to Photoshop, as opposed to final rendered images. The method outlined below sends FINAL rendered images.***
The second and newer way, featured in v1.7, is through the use of an external script called Janus_SendTo_Photoshop.ls, which is included in the Janus distribution. This requires no setup, except that you must go to Preferences > External Applications, and input the paths to Photoshop and/or After Effects. Select the render passes you wish to export and go to Scripts > Janus_SendTo_Photoshop. This will bring up a dialog asking if you want to export buffers.
Janus will replace layers with the same name. Note that you can modify layer names by the use of the LAYERNAME subcommand; blending modes can also be changed via the BLENDMODE subcommand.
Please note that Janus considers the current frame your time slider is in, so make sure you have rendered that particular frame you are on.
Exporting (Sending) Renders to After Effects
Similarily to its Photoshop counterpart, Janus_SendTo_AfterEffects.ls sends the render passes' image sequences into After Effects. Since it sends the whole sequence, it doesn't matter what frame number you are currently on. It features two other options when you run it: you can optionall export buffers, and choose how compositions are created in After Effects.
If you choose Append to comp with same name, the scene name will be used as the composition name, and Janus will target any composition in the project with the same name.
Append to active comp will take the current composition you have open in After Effects are send the images there.
Create new comp always will create a new comp whenever you send images to After Effects.
Exporting (Sending) Passes to Render via LWSN -3
When you break out your render passes you can run Janus_LWSN_3_Render from the Scripts menu. This takes the selected render passes and determines the scene associated with it, and runs ScreamerNet at mode 3 to render it. Note that you must have already broken out the scene for this script to work. You can send multiple render passes if you'd like.
Pseudo-Satellite Rendering (PSAT)
Pseudo-satellite rendering (or PSAT) distributes test renders of multiple passes into LWSN nodes running in mode 2. It is called "pseudo" because it is only a convenience feature, not true satellite rendering, rather it is actually distributed rendering.
Before you can use PSAT, you have to supply Janus with the location of the job/ack files you use for mode 2 rendering. Go to Preferences > Test Rendering, and input in the LWSN -2 Job/Ack Directory field the appropriate path. Make sure that Janus is permitted to use the correct range of nodes by inputting the corresponding node numbers into the Permitted LWSN Nodes field.
Finally, to enable the feature, go the Misc Options menu and tick PSAT from the drop-down.
To view the render passes that have been queued, go to the Test Render menu and choose PSAT: view queued test render scenes; this will bring up a list and you have the option of removing scenes from the queue.
External Image Viewer
You may specify a particular image viewer that you wish to use after the test render is completed. If there is no viewer specified the image will open up with the OS's default viewer.
Surface Overrides and Surface Presets
Surface presets come with Janus. However, things like occlusion are often hand-tweaked - range and spread parameters vary from scene to scene. Sometimes, however, a series of occlusion shaders can be collected and then put in a folder for easy retrieval. Janus has its own default folder (e.g. locationOfScript/Janus_SupportFiles/Janus_Surfaces/*.srf), but may also be user-defined (in the Preferences). When you access a group's override to change the surface override, you will see a popup list with the surfaces that is contained in your preset folder.

The user also need to be aware what actually is going on when surface overrides are employed. LightWave does not allow any 'render-time' commands to change the surfaces of LightWave objects. Janus manages this by applying the desired surface file to your object and saving it out as a unique object file, which is then remapped for that render pass. You need to be aware of this because it all happens 'under the hood', and those objects need to be kept as long as the passes haven't been rendered yet. Only then it is safe to delete them, if you wish. Janus cannot delete them for you because it has no way of knowing when the scene has been already rendered.

The image above shows what is going on internally. An object has had its surfaces replaced and saved in another location.
The new objects generated by Janus may be located in two places, depending on how you have set it up in the Preferences. You can set it up either by allowing Janus to store the objects under a \Janus_LWO\ folder that resides in the same directory as the object in question. Or you can set it up so that it saves all objects in one user-specified directory (with appropriate subdirectories that Janus will manage). The latter option makes it easier to locate and delete these new objects after rendering. But the former option reduces the chance of objects with clashing names.
Multi-Surface Overrides
Janus (v1.2.2) supports the ability to recall multiple surfaces for objects through the use of a text file. For example, if you have an object with alternate surfaces you save out these surfaces into a folder; the surface filenames must correspond to its surface name in the Surface Editor. When the surfaces are in their directory, you create a text file containing the folder path:
D:\MyProject\shaders\myObject\surfacePreset1\
**Important note: you must have at least one empty line at the end of the text file**
This text file is then referenced normally as a surface override.
BTY2.BG.SRFBoth"newSurface.txt".myObject
In Janus 1.4.1, multi-surface overrides were enhanced to account for overriding multiple surface of multiple objects. To to this a proper naming convention must be employed in your naming of surface files. Janus will try to locate the surface for a specific mesh, and its specific surface. The formatting is defined this way:
MyObject.MySurface.srf
When Janus sees this file it interprets it as MyObject being the mesh intended for this file, and MySurface is the surface name of MyObject. But if you omit MyObject, then those meshes with no specific surface files for them will simply have any matching surface file. For example, if you have MyObjectA and MyObjectB, and both have Surface1 and Surface 2 as their surfaces, and if we have these surfaces in our multi-surface override location:
MyObjectA.Surface1.srf
Surface1.srf
Surface2.srf
Janus will load MyObject.Surface1.srf and override MyObjectA's Surface 1 surface. Because the other two surface do not specify any mesh, MyObjectA's Surface2 will get Surface2.srf, and MyObjectB's both Surface1 and Surface2 surfaces will load Surface1.srf, and Surface2.srf, respectively.
Partial Overrides
Janus has the ability to partially override an object's settings. What this means is that surface channels (ie Base Color, Transparency, Specularity, etc) are disconnected or set a 'zero' value, while some retain their original values. For example, if you wanted to create a specular surface override on an existing item, you may want to disconnect the color, diffuse and transparency, while keeping the specular, and bump values or map intact.
Partial overrides are called by inputting a special syntax into what you normally input as surface file. However, it is usually better to call on this using command types. Some of Janus's command types already utilise partial overrides.
So while surfaces can be overriden by specifying a .srf file, or in the case of multi-surface overrides, a .txt file, with partial overrides you specify a surface override type. Surface override types are like command types: they encapsulate a series of directives for Janus to execute. They are defined in Janus_SurfaceOverrides.txt which is located in your Janus_SuppportFiles directory. In order to use surface override types you must enclose them in less-than and greater-than symbols. This is how it looks like as a subcommand:
BTY2.BG.SRFActive"<Spec>".myObject
This is how it may look like in a command type. The example below is the NORMALS command type:
[NORMALS]
INHERIT=BTYRAW
INHERIT=BTY2
ACTIVE.BOTH.SRF="<Normals>"
SCENE.CMD=OUTPUTSUBDIR"normals"
Note that you can input a surface override type in the Global Settings, and even in the Group Overrides' Surface Override field, but you must explicitly type in the less-than and greater-than symbols yourself so that Janus knows that you are referring to a surface override type, not a filename.
Note the a surface override type is essentially a partial override; these two terms are interchangable. Again, the concept of partial override is that it is partial; it disconnects some channel parameters (eg resets them), and leaves some intact. We can define which channels are to be excluded from disconnection, and what values are to be used for particular channels. Below is an example of the specular override:
[Specular]
exclude=Specular
exclude=Specularity
exclude=Glossiness
exclude=Bump
exclude=Normal
exclude=Specular Shading
setvalue=Diffuse=0
setvalue=Color=1,1,1
The exclude directive tells Janus which surface channel is to be excluded from disconnection. The setvalue directive tell Janus what value a surface channel should have. Note the syntax: setvalue is followed by an equals sign, and then the name of the surface channel (case-sensitive), and then follows an equals sign again to specify the value of the channel. If you do not specify a setvalue for a particular channel, Janus has a prebuilt assumption of values. The following attributes' values will be used by Janus if the surface override type does not specify it:
BaseColor = 0,0,0
Luminosity = 0%
Specularity = 0%
Glossiness = 0%
Reflectivity = 0%
Transparency = 0%
IOR (Refraction Index) = 1.0
Translucency = 0%
Bump = 100%
Some surface channels do not have an assumed value. These channels will not be changed unless explicitly specified. Below is the list of unchanged channels:
Sidedness (Double-sided)
SmoothingAngle
ColorFilter
AdditiveTransparency
DiffuseSharpness
BumpDropoff
ColorHighlights
LineSize
SpecialBuffer1
SpecialBuffer2
SpecialBuffer3
SpecialBuffer4
VertexColoring
GlowValue
AlphaValue
ReflectionBlurring
RefractionBlurring
ReflectionSeamAngle
RefractionSeamAngle
ReflectionImage
RefractionImage
ReflectionOptions
RefractionOptions
Surface override types also have the ability to attach a shader into a surface using the shader directive. The name of the shader must match its name as it appears configuration file (lwext.cfg). As an example, here is the Normals surface override type.
[Normals]
exclude=Bump
exclude=Normal
setvalue=Luminosity=1
setvalue=Diffuse=0
shader=NormalColor
null=func:nullFunction():
If you look again in the Specular surface override type, you will notice that Specular and Specularity are defined. These similarly-named channels are defined because of internal naming inconsistency in LightWave, where Specular refers to the node-based channel, and Specularity refers to channel belonging to the classic layer-type texturing system. You will also note "Specular Shading", which is a unique surface channel of the nodal system. Note that the naming is strict and case-sensitive. With node-based surface channels you can refer to the spelling exactly as they appear in the Node Editor. With layer-baed surface channels, here is a complete list of surface channels (along with currently supported surface override directives).
You will also notice a null directive. This directive does nothing more than execute user functions.
Basic Surface Channels |
Advanced Surface Channels |
|---|---|
| BaseColor | ColorFilter
|
| Luminosity | AdditiveTransparency |
| Specularity | DiffuseSharpness |
| Glossiness | BumpDropoff |
| Reflectivity | ColorHighlights |
| Transparency | LineSize |
| IOR | SpecialBuffer1 |
| Translucency | SpecialBuffer2 |
| Bump | SpecialBuffer3 |
| Sidedness | SpecialBuffer4 |
| SmoothingAngle | VertexColoring |
| GlowValue | |
Surface Override Directives |
AlphaValue |
| exclude | ReflectionBlurring |
| setvalue | RefractionBlurring |
| shader | ReflectionSeamAngle |
| null | RefractionSeamAngle |
| ReflectionImage | |
| RefractionImage | |
| ReflectionOptions | |
| RefractionOptions |
Note that partial overrides leverage the Surface Editor's commands, so this functionality is only available in online mode, when Layout is running. Also, you may notice that these commands are a reflection of actual Surface Editor commands.
Partial overrides can also make use of user functions. In fact, partial overrides feed two extra default arguments to user functions that are designed to take them in. When user functions are called within a partial override, the function will receive two default arguments: the name of the mesh being processed, and the surface name that's being changed. These two arguments are always at the last of arglist. So suppose you call this function in a partial surface override:
func:psoFunc(1):
What Janus will end up passing onto the user function is not one argument, but three: the user-fed value (eg '1'), the mesh name (eg arglist[2], and surface name (eg arglist[3]):
JNUF_psoFunc: arglist
{
userinput = arglist[1];
m = Mesh(meshname = arglist[2]);
surf = Surface(meshname,arglist[3]);
}
Partial overrides can also accept constant variables:
func:psoFunc(%JN_FOREACHNDX%):
There are several examples of using partial overrides in conjunction with user functions and constant variables in the Janus_SurfaceOverrides.txt and Janus_UserFunctions.ls.
Surface Override's Object Naming Format
Objects are saved using a naming format for both the subdirectory it resides in, and the actual filename. If our object was box.lwo, and we were applying occlusion.srf to it, the final name of the object will be box.lwoPEGN and will be placed under a directory called \occlusion.srf\ denoting that all objects that have been applied that surface file will be placed there. This directory is placed under a user-specified directory. If the user opted for the directories under which the object in question was overridden, then it places the subdirectory under \Janus_LWO\. If the user has opted for a single user-defined directory, then the subdirectory is placed there. However, note that it is still a relative subdirectory; it will be placed under the current project's root.
That said, it should be apparent that the uniqueness of your surface names are important, for it they denote a 'set' of objects which will be placed under a directory of their name.
There is a Always Save Surface Overrides checkbox that, when turned on, will always save out a copy of the object with your assigned surface override.

This is for safety, and will ensure that surface overrides are applied all the time. However, depending on your situation, it may be more efficient to turn it off when you have made no modifications to your shader, or object. Since the surface-overridden-objects in the folder named after the surface filename (assuming the surface filename is unique), you can be sure that all of the objects contained in that folder is of the correct surface. No re-application of the surface overrides is necessary after it has been done once. By unchecking Always Save Surface Overrides, Janus will first check if an object under the specified surface override directory exists. If it does, it simply remaps that pass's item(s) to that object file. If it doesn't, then it saves that object with the surface override.
There are known bugs, albeit non-critical ones, regarding surface overrides. Please refer to the Known Bugs and Limitations section.
Aborting the Breakout Process
Janus provides an external method to aborting a breakout process. Because there is no mechanism within LScript to do this, this feature has been relegated as an external .bat file called Janus_AbortProcess.bat, which is located in the supplied Janus_SupportFiles folder. When an breakout process is proceeding, running this batch file will signal Janus to abort the process. This file writes to another file which Janus is monitoring, namely Janus_AbortFile.txt.
For Loops
In Janus, a for-loop is a mechanism that loops/iterates through a series of files, lines in a text/ASCII file, or groups, creating new render passes while doing so. Here are some examples of what you can do with for-loops:
For-loops are categorised based on what data they iterate through.
For-Loop Directory (FORDIR)
The for-loop directory method iterates through files contained in a specified directory (you can specify absolute or relative path: relative paths must be relative to the content directory or the surfaces directory). These files can be further filtered through the use of wildcards. As the for-loop iterates through the files it puts the filename into several constant variables where the user can it up. For example:
NOM.BG.forDir”D:/ProjectDir/surfaces/*.srf”.SRFBoth”%JN_FORDIR_FILEPATH%”.targetGroup
The render pass above goes into the /surfaces folder and tries to locate files with a .srf extension. If/when the files are located, it will iterate through each file, and will assign the filename to the constant variable %JN_FORDIR_FILEPATH%. If the /surfaces directory had three .srf files named Surface1.srf, Surface2.srf, and Surface3.srf, Janus will dynamically generate these render passes and break them out:
NOM.BG.SRFBoth”D:/ProjectDir/surfaces/Surface1.srf”.targetGroup
NOM.BG.SRFBoth”D:/ProjectDir/surfaces/Surface2.srf”.targetGroup
NOM.BG.SRFBoth”D:/ProjectDir/surfaces/Surface3.srf”.targetGroup
Below is a list of constant variables that FORDIR outputs to:
For-Loop File (FORFILE)
The for-loop file method iterates through the lines of a single file that is specified with the subcommand. The file specified must be an ASCII file, and must always have an empty line at the end of the file (so that the whole file can be read properly). As the FORFILE iterates through the text lines of the file, it outputs those lines into the following constant variables.
For-Loop Group (FORGROUP)
The for-loop group method iterates through a render pass’s associated groups (both active groups and other groups). It is possible to use regular expressions in order to match a specific set of groups. If no subcommand value is provided, then it iterates through all groups. In the example below the FORGROUP subcommand is used to render candidate groups separately:
BTY.BG.forGroup”^ObjGroup”.ActiveGrp”%JN_FORGROUP_NAME%”.targetGroup
The above render pass will match associated groups beginning with ‘ObjGroup’, and then it feeds the group name to the activeGrp subcommand. This makes that group an active group, and thus render it on its own (due to the BTY render type).
This is a list of constant variables that FORGROUP outputs to:
For-each Group (FOREACH)
This is Janus's For Loop construct for iterating through a user-specified loop. This is similar to the for() loop. The subcommand accepts three parameters separated by commas. The first parameter is the start index (initialisation value), then the ending index (conditional statement), then the increment value (eg only increments up). The FOREACH subcommand outputs the following variables associated with it:
This is a list of constant variables that FOREACH outputs to:
Items In Group Overrides
Items in group overrides allow you to programmatically modify settings of each item in a group. In the usual Janus operation specific items have always been under groups, and when you apply settings to a group, they are propagated down to the items. But using Items In Group overrides, you will be able to fine-tune those settings even further, at the last minute.
One good application of this is through the use of object matte IDs. Through the use of user functions, and the new constant variables %JN_GROUPITEMNDX% and %JN_GROUPITEMNAME%, Janus can dynamically feed your user function with the index or name of the item being processed, and based on that, modify the command line to get a different result. This video tutorial demonstrates how this is done.
JN_GROUPITEMNDX and JN_GROUPITEMNAME
When %JN_GROUPITEMNDX% or %JN_GROUPITEMNAME% is encountered in any render pass cmd line, Janus knows to process the render pass for Items in Group overrides. It refreshes the cmd line for each object it processes, dynamically replacing %JN_GROUPITEMNDX% with an integer value representing the item index (in the Items in Group list) being worked on. It also replaces any variable call to %JN_GROUPITEMNAME% with the name of the item alias (eg as it appears in Layout).
Syntax Errors
Janus does not check for the existence or possible spelling mistakes of subcommands when they are inputted manually. It is easy for a starting user to make mistakes regarding spelling and syntax rules. For this reason the + buttons exist on the side of every command in the main UI. Clicking on these buttons will append that particular subcommand (with their currently set parameters) onto the command. (Clicking on it again will remove it). Some subcommands whose syntax are more complex may not be fully expressed by this method. But the add buttons help in making sure it is spelled correctly.
Default Output Image Format
The default output image format can be set in the Preferences. Furthermore, an image format can be specified on a per-pass setting using the OUTFORMAT subcommand. See the Subcommands reference for details.
Case Sensitivity
Janus's internal functions are case-insensitive, even when performing search-and-replace.
Name-based Functions and Naming Conventions
Janus is strictly name-based regarding Layout items and other entities. This means that Janus will not track changes in item names or item hierarchies when you change them in Layout. If you assigned an item called 'MyItem' in a group, and then duplicated that group so that it was renamed to 'MyItem (1)', Janus will lose track of this object. The proper workflow in this respect is to create Nulls (to be used as a grouping device) which are uniquely named. These Nulls are then assigned to propagation groups (see below).
Scene-naming Convention and Image Output Directory
One distinct and unalterable behavior of Janus is that it will create and output its destination images based on the scene's filename. This is part of a personal approach to organisation and its automation and is inbuilt in Janus. A directory will be created in the images folder (or a user-specified image folder) based on the scene's name.
SEQ_OPENING.lws --> \images\SEQ_OPENING\
If a scene name is punctuated by periods (.) to denote specificity, then a subdirectory will be created for it:
SEQ_OPENING.SHOT01.lws
generates: \images\SEQ_OPENING\SHOT01
SEQ_OPENING.SHOT01.ROBOT.lws
generates: \images\SEQ_OPENING\SHOT01\ROBOT
SEQ_OPENING.SHOT01.GROUND.OCC.lws
generates: \images\SEQ_OPENING\SHOT01\GROUND\OCC
If this type of directory structuring does not suit you, Janus can be instructed to use output directories through the subcommands OUTPUTSUBDIR, OUTPUTABSDIR and PASSNAME. SCENENAME and SUBSCENENAME name can also be used to override the default behavior and thus the final output of the image files. Nevertheless, the main folder after \images\ will always be based on the actual name of the scene, except in the case of OUTPUTABSDIR which treats the inputted value as an absolute directory.
Defining the Base Image Output Directory
The section above talked about how Janus creates subdirectories under the base image output directory. In this section we'll see how we can tailor-fit the base image output directory itself. Let's make a several case studies demonstrating this.
Let's assume you are working on three (3) projects simultaneously. Below are their content directory paths.
X:\Project_Alpha
Y:\ArchiProjs\Project_Bravo
Z:\Project_Zulu
First scenario: you want to save their images relative to their own content directory. Specify a subdirectory name in the Preferences > Output Image Directory (let's say it was 'finalRenders'):
finalRenders
This would bring the images relative to the current content directory:
X:\Project_Alpha\finalRenders
Y:\ArchiProjs\Project_Bravo\finalRenders
Z:\Project_Zulu\finalRenders
Second scenario: you have a common directory for rendered images shared by all projects. Specify the absolute location of that common directory in the Preferences > Output Image Directory:
H:\3D_RenderedImages
This paths the images directly to that folder, but will follow the standard Janus subfolder-creation convention mentioned earlier in this section.
Third scenario: like in the second scenario you have a common directory, but want to further organise it by its project name. Here we utilise constant variables to insert the project's name dynamically. In the Preferences > Output Image Directory input:
H:\3D_RenderedImage\%JN_CONTENTNAME%
And based on the current content directory you are working on, it will ouput images in:
H:\3D_RenderedImage\Project_Alpha
H:\3D_RenderedImage\Project_Bravo
H:\3D_RenderedImage\Project_Zulu
Third scenario variant: if you wish to maintain the original pathing of your project, as in the case of Project_Bravo where it was actually nested inside the directory called ArchiProjs, you use the %JN_CONTENTREL% constant variable:
H:\3D_RenderedImage\%JN_CONTENTREL%
Which then brings it to:
H:\3D_RenderedImage\Project_Alpha
H:\3D_RenderedImage\ArchiProjs\Project_Bravo
H:\3D_RenderedImage\Project_Zulu
Remember that if you use OUTPUTABSDIR on a pass it will override the base output image directory. However, you can also use constant variables within the subcommand. This gives you finer control on per-pass basis:
OUTPUTABSDIR"F:\SomeOtherDirectory\%JN_CONTENTNAME%"
Just a warning: be aware of how you spell the constant variables because if they are mispelled or have the wrong syntax (e.g. not completely surrounded by percentage (%) signs) they will be considered literal paths, and will not be processed as expected. Furthermore use the proper constant variable for what is expected. For example do not use the %JN_CONTENTABS% variable, which evaluates as an absolute path, together with a subcommand such as OUTPUTSUBDIR, which expects a relative path.
Pass Folders and Breakout Location
The Pass Folders feature is an organisational tool reduces clutter caused by numerous render pass scenes. Breakout Location is a user-specified path, which enables you to directly output your pass scenes to a location outside your content directory. For example, in ButterflyNetRender, you can send the pass scenes directly to the Autoload folder.
Using Pass Folders / Breakout Location Example
Let's have four different workflows to demonstrate how to utilise Pass Folders / Breakout Location to meet those requirements.
Workflow # 1: ButterflyNetRender Autoload Folder. Supposing we need to output to a newtorked folder that serves a global repository of render scenes, similar to that of BNR's Autoload folder. To do this, we choose Breakout to user-defined folder, and in the Breakout Folder Path we input the absolute path of the folder:
Z:\RenderScenes\Autoload\
If we want to create subfolders to organise it based on scenes turn on Pass Folders > Create pass folder for each scene. If you had a master scene called MyScene, this will bring your pass scenes to:
Z:\RenderScenes\Autoload\MyScene\
Workflow # 2: Content Directory - Scenes Folder. If you'd like to output your passes in the same directory as your master scene choose Breakout to same folder as scene. Choose Pass Folders > Create pass folder for each scene if you want it to be put in a subfolder.
Workflow # 3: Content Directory - Other Folder. If the pass folder is not in the same directory as your scene, but is still within the content directory, then choose Breakout to user-defined folder, and in the Breakout Folder Path we input the following:
%JN_CONTENTABS%\RenderScenes\
Again, choose Pass Folders > Create pass folder for each scene if you want to create subfolders.
Workflow # 4: Project-based Global Folder. If the pass folder is a global folder, like the one in Workflow # 1, but is organised based on project name, then choose Breakout to user-defined folder, and in the Breakout Folder Path we input the following:
Z:\%JN_CONTENTNAME%\Autoload\
Choose Pass Folders > Create pass folder for each scene if you want to create subfolders
The Pass Folders feature is an organisational tool reduces clutter caused by numerous render pass scenes. Breakout Location is a user-specified path, which enables you to directly output your pass scenes to a location outside your content directory. For example, in ButterflyNetRender, you can send the pass scenes directly to the Autoload folder.
Problem: Using surface overrides with Gardner Clouds, a third-party procedural texture by Denis Pontonnier, will cause a crash.
Workaround: Either avoid using this procedural texture, or temporarily copy a 'valid' surface onto the offending surface before outputting that pass. Reload the object after the pass has been exported.
Problem: Using surface overrides strips Pipes and Plank procedural textures from your surfaces.
Workaround: Do not save your objects when you use surface overrides with surfaces containing these procedural textures. Either reload your objects or reload your scene.
Problem: Opening the Janus interface using the JanusOpenGN.ls sometimes results in a crash.
Workaround: This may happen more frequently when a scene that already contains Janus is loaded. In this case it is sometimes more advisable to go directly to the Master Plugins panel and double-click the Janus entry to open up the interface. This is not totally fool-proof but it gives a better performance.
Problem: As of the Janus release version (1.0), you cannot use surface overrides in conjunction with object replacement. It's either one or the other. This is due to the process by which surface overrides are applied to objects that are loaded into Layout, while object replacement is purely string-based (directly text-replaced in the scene file).
Workaround: There is no workaround to this limitation.